Monthly Archives: May 2026

Best GPS Tracking Systems for Commercial Fleets: Keep Your Vehicles Secure

Source:https://www.eelinktech.com

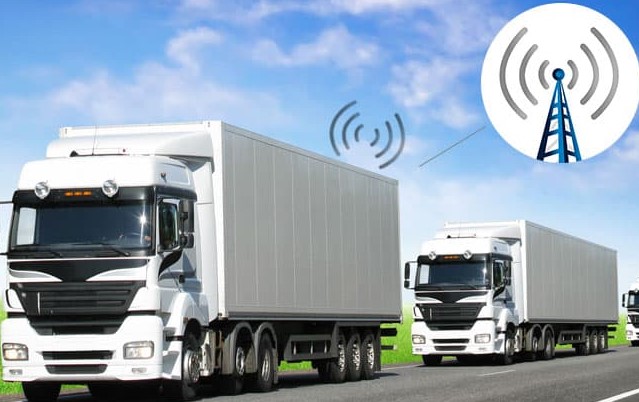
Three years ago, a close friend of mine—who runs a mid-sized delivery fleet—called me at 2:00 AM. One of his box trucks, loaded with high-value electronics, had vanished from the driver’s driveway. The driver had followed all protocols, but professional thieves are faster than protocols. Because he had invested in a high-end tracking system just two months prior, we sat at his kitchen table and watched a blinking blue dot move across the interstate in real-time. Within forty minutes, the police had intercepted the vehicle.

In my ten years in the automotive industry, I’ve seen GPS tracking evolve from a “nice-to-have” luxury into the literal heartbeat of commercial operations. Today, it’s not just about knowing where your trucks are; it’s about fuel efficiency, driver safety, and predictive maintenance. If you are still managing your fleet with spreadsheets and “phone-call check-ins,” you aren’t just behind the curve—you’re leaving money on the table and your assets at risk. Let’s break down the best GPS tracking systems for commercial fleets and how to choose the one that fits your mission.


The “Check Engine” for Your Business: Why Tracking Matters

I like to tell fleet managers that a GPS tracker is like a fitness tracker for your truck. Just as a smartwatch monitors your heart rate and steps, a fleet management system monitors the “health” and “behavior” of your vehicles.

The Real Benefits:

  • Theft Recovery: As seen in my 2:00 AM story, real-time visibility is the difference between a recovered asset and a total loss.

  • Fuel Savings: Systems now track “Idling Time.” If a driver leaves the engine running for 45 minutes while eating lunch, you’re literally burning cash.

  • Driver Accountability: Tracking “Harsh Braking” and “Rapid Acceleration” helps you coach drivers before they cause an accident.

  • Compliance: Modern systems automatically handle ELD (Electronic Logging Device) and IFTA (International Fuel Tax Agreement) reporting, saving you dozens of hours of paperwork.


The Big Three: Top GPS Tracking Systems for 2026

After testing dozens of platforms and seeing them perform in high-pressure environments, three names consistently rise to the top of the pile.

1. Samsara: The “All-in-One” Powerhouse

Samsara is the current heavyweight champion for a reason. They offer a unified “Operations Cloud” that connects everything.

  • Best For: Large fleets and enterprises that need a “single-pane-of-glass” solution.

  • The Killer Feature: AI Dash Cams. Their cameras can detect if a driver is looking at their phone or distracted and provide real-time voice coaching to correct it before a crash happens.

  • LSI Terms: Telematics, IoT sensors, cloud-based dashboard.

2. Verizon Connect (Reveal): The Reliability King

Leveraging Verizon’s massive network infrastructure, this system offers some of the most stable and high-frequency location updates in the industry.

  • Best For: Mid-sized fleets that prioritize dispatching and route optimization.

  • The Killer Feature: Route Replay. You can literally “rewind” a driver’s day to see exactly where they stopped, for how long, and if they took an unauthorized detour to a coffee shop.

3. Motive (Formerly KeepTruckin): The Compliance Specialist

Motive has built a reputation for having the most user-friendly interface for both drivers and managers.

  • Best For: Small-to-mid-sized trucking companies that need rock-solid ELD compliance.

  • The Killer Feature: Automated HOS (Hours of Service) Tracking. It’s nearly foolproof, which keeps DOT inspectors happy and your trucks on the road.


Technical Deep Dive: 2G vs. 4G vs. Satellite

When looking for GPS tracking systems for commercial fleets, you’ll hear a lot of “tech-speak.” Here is what actually matters:

  • Refresh Rates: Some cheap units only update every 2 or 5 minutes. In a theft situation, 5 minutes is an eternity. Look for systems with 30-second or 1-second updates.

  • Plug-and-Play vs. Hardwired: * OBD-II (Plug-and-Play): Great for vans and cars. Easy to install but also easy for a driver to unplug.

    • Hardwired: Hidden behind the dash. Harder to tamper with and can pull more data from the vehicle’s computer (like fuel levels and engine fault codes).

  • Geofencing: This allows you to draw a virtual “fence” around a job site or parking lot. If the vehicle leaves that zone outside of work hours, your phone explodes with alerts.


Expert Advice: The “Hidden” ROI of Fleet Tracking

Many beginners look at the monthly subscription fee (usually $20 – $50 per vehicle) and hesitate. But here is an “insider” tip: Call your insurance agent before you buy.

Most commercial insurance providers offer significant discounts—sometimes up to 15%—on your premiums if you have an active GPS tracking and driver-coaching system installed. In many cases, the insurance savings alone pay for the entire system.

Pro Tip: Don’t just buy the hardware. Check the Contract Length. Many legacy providers try to lock you into 36-month or 60-month contracts. In 2026, look for providers offering flexible 12-month terms or even month-to-month options for smaller fleets.


Privacy vs. Performance

One thing I’ve learned through trial and error: Transparency with your drivers is vital. If you “spy” on your drivers without telling them, morale will plummet faster than a lead weight.

Analogy: A GPS tracker shouldn’t be a “Police Officer” in the passenger seat; it should be a “Co-Pilot.” Frame the installation as a safety tool that protects them from false accident claims and helps the company grow so everyone gets a raise.


Conclusion: Stop Flying Blind

The days of wondering where your assets are located are over. Investing in one of the best GPS tracking systems for commercial fleets isn’t just an expense—it’s a shield for your business and a turbocharger for your efficiency.

Whether you choose the AI-driven tech of Samsara, the reliability of Verizon, or the simplicity of Motive, the most important step is simply getting started.

Are you currently managing a fleet, or are you just starting your first commercial venture? Tell me about your biggest “fleet headache” in the comments, and let’s see if we can solve it with the right tech!

Brake Pad Replacement: When and How to Do It

That high-pitched, metallic screeching sound as you pull up to a red light isn’t just an embarrassing social faux pas—it’s your car screaming for help. In my fifteen years under the hood, I’ve seen everything from perfectly maintained Brembos to rotors that looked like they’d been chewed on by a mechanical shark.

The most terrifying thing? Many drivers ignore that sound until the pedal feels like a sponge and their stopping distance triples. Your brakes are the most critical safety system on your vehicle; they are the only thing standing between a controlled stop and a very expensive insurance claim.

In this deep dive, I’m going to pull back the curtain on brake pad replacement. I’ll show you how to tell when your pads are “cooked” and guide you through the process of swapping them out yourself. Trust me, once you realize how simple this is, you’ll never pay a shop $400 for a “standard brake service” again.


The Anatomy of Stopping: How Brakes Actually Work

Think of your braking system like a bicycle handbrake, but on steroids. When you push the pedal, hydraulic fluid (Brake Fluid) travels through lines to a Caliper.

The caliper acts like a giant clamp. Inside that clamp are your brake pads. When the pressure hits, the caliper squeezes those pads against a heavy metal disc called the Rotor (or Disc).

The friction between the pad and the rotor is what stops the car. This friction generates massive amounts of heat—sometimes upwards of 500°C during heavy mountain driving. Over time, that friction material literally grinds away into dust, which is why your wheels get that dark, grimy coating.


When to Pull the Trigger: Signs You Need Brake Pad Replacement

I’ve had customers swear their brakes were “fine” only for me to find the pads worn down to the backing plate (metal-on-metal). Don’t wait for the sparks. Watch for these red flags:

1. The Acoustic Warning (The Squealer)

Most modern pads have a small metal tab called a wear indicator. When the friction material gets dangerously thin, this tab touches the rotor and creates that infamous high-pitched chirp. It’s a built-in alarm clock telling you it’s time to wake up.

2. The Steering Wheel Shudder

If your steering wheel vibrates or pulses when you apply the brakes, your rotors might be warped or have uneven pad deposits. While this usually means you need new rotors, it’s a sign that your pads haven’t been doing their job effectively.

3. Visual Inspection (The 1/4 Inch Rule)

If you have alloy wheels with wide gaps, you can often see the pads without taking the wheel off.

  • Look at the pad thickness: If the friction material is less than 3mm (about 1/8 to 1/4 inch), you are in the danger zone.

4. The Spongy Pedal

If the brake pedal feels “soft” or goes almost to the floor before the car slows down, you likely have air in your lines or severely worn pads that are forcing the caliper pistons to overextend.


Choosing Your Material: Organic, Semi-Metallic, or Ceramic?

Not all pads are created equal. In my shop, I always ask the owner: “How do you drive?”

  • Organic (NAO): Made from fibers like glass, rubber, and carbon. They are quiet and soft, but they wear out fast and create a lot of dust. Best for light city commuting.

  • Semi-Metallic: The “working man’s” pad. They contain 30-65% metal. They have incredible stopping power and handle heat well, but they can be noisy and are “aggressive” on your rotors.

  • Ceramic: The gold standard for daily drivers. They are incredibly quiet, produce almost no visible dust, and last a long time. However, they aren’t ideal for extreme racing or heavy towing.


Step-by-Step Guide to Brake Pad Replacement

If you can change a tire, you can likely change your brake pads. Here is the workflow I use every day.

Preparation and Tools

You will need:

  • A floor jack and jack stands (Never work on a car supported only by a jack!)

  • A lug wrench

  • A basic socket set (usually 12mm to 14mm for calipers)

  • A C-clamp or a brake piston tool

  • Brake cleaner and high-temp brake grease

Step 1: Secure the Vehicle

Loosen the lug nuts while the car is on the ground. Jack it up, secure it on jack stands, and remove the wheel.

Step 2: Open the Caliper

Locate the two bolts holding the caliper to the bracket. Usually, you only need to remove the bottom bolt and loosen the top one to “swing” the caliper up.

Pro Tip: Never let the caliper hang by the rubber brake hose. It will damage the internal lining. Use a bungee cord or a coat hanger to zip-tie it to the suspension spring.

Step 3: Out with the Old

Pop the old pads out. Take note of how the anti-rattle clips are positioned. If your new pads came with new clips (and they should), pull the old ones off and snap the new ones in.

Step 4: Retract the Piston

As your pads wear down, the caliper piston stays pushed out. To fit fat, new pads in, you have to push that piston back.

  • Place an old brake pad over the piston.

  • Use your C-clamp to slowly squeeze the piston back into the caliper housing.

  • Warning: Keep an eye on your brake fluid reservoir under the hood. Pushing the piston back forces fluid back up, and it might overflow.

Step 5: Grease and Install

Apply a thin layer of high-temp brake grease to the back of the new pads where they touch the caliper.

  • DO NOT get grease on the front (friction) side of the pad or the rotor.

  • Slide the new pads into the clips.

Step 6: Reassemble

Swing the caliper back down over the new pads. Re-insert the bolts and tighten them to the manufacturer’s torque specs (usually around 25-35 ft-lbs for small cars). Put the wheel back on and lower the car.


Expert Advice: The “Bedding-In” Process

The biggest mistake beginners make is finishing the job and immediately flying down the highway.

The Secret “Hidden” Step: Before you even put the car in gear, pump the brake pedal 5-10 times while the engine is running. The first few pumps will go to the floor—this is normal as the piston moves out to meet the new pads.

Once the pedal feels firm, you need to “Bed-In” or “Burnish” the pads. Drive to a quiet road and perform 5 or 6 moderate stops from 40 mph down to 10 mph. This transfers a thin layer of pad material onto the rotor, ensuring a smooth, noise-free stop for the rest of the pad’s life.


Conclusion: Take Charge of Your Safety

Replacing your own brake pads is a rite of passage for any DIY mechanic. It builds a deeper connection with your machine and ensures that the most vital safety component on your car is handled with care—not just rushed through by a “lube tech” at a franchise shop.

Remember, if you encounter heavy rust, leaking fluid, or a piston that refuses to move, don’t be afraid to call in a professional. There is no shame in seeking help when it comes to stopping power.

Are you planning to tackle your brakes this weekend, or do you have a horror story about a “squeal” that wouldn’t go away? Share your thoughts in the comments below—I’d love to hear about your garage wins and challenges!

Off-Road Lighting Upgrades: Best LED and Halogen Options

Source:https://cdn.shopify.com

Imagine this: You’re deep in the backwoods, the sun dipped below the horizon twenty minutes ago, and the trail that looked “manageable” in broad daylight has turned into a labyrinth of jagged rocks and hidden ruts. You flick on your factory high beams, and… nothing. The light barely reaches past your hood, swallowed by the oppressive darkness of the wilderness.

I’ve been there. Early in my career, I spent a night stuck in a wash in the Mojave because my stock “yellowish” headlights couldn’t differentiate between a soft sand dune and a six-foot drop-off. That night taught me a fundamental truth: In the world of off-roading, light isn’t just a luxury; it’s your primary safety equipment.

Whether you are a weekend warrior or a seasoned trail veteran, off-road lighting upgrades are the single most effective way to extend your adventure and protect your rig. But with the market flooded with cheap Amazon knockoffs and high-end racing setups, how do you choose? Let’s dive deep into the world of Lumens, Candela, and the eternal battle between LED and Halogen.


Understanding the Physics: Lumens vs. Candela

Before we talk about hardware, we need to clear up the biggest marketing lie in the industry: “Higher Lumens equal better lights.”

I often tell my clients to think of Lumens as the total amount of paint in a bucket, while Candela is how far you can throw that paint with a brush. * Lumens: The total raw light output from the source.

  • Candela: The intensity of that light in a specific direction.

If you have 50,000 Lumens but no focus (low Candela), you just have a glowing ball of light that blinds you with “hood glare” and doesn’t show you the obstacle 100 yards away. Precision optics matter more than raw power.


The Old Guard: Why Halogen Still Matters

In an era where everything is digital, Halogen might seem like a relic. But don’t dismiss it just yet. Halogen bulbs work by passing electricity through a tungsten filament inside a glass capsule filled with halogen gas.

The Benefits of Halogen

  • Color Rendering: Halogens typically sit at around 3000K to 3500K on the Kelvin scale. This warm, yellow-amber light is superior in fog, dust, and snow. It doesn’t reflect off water particles as harshly as blue-white light does.

  • Heat Generation: This is a “secret” advantage. In freezing climates, Halogen lamps generate enough heat to melt ice and snow off the lens. Most LEDs run cool, meaning your lights can become “iced over” during a winter trek.

  • Cost: They are significantly cheaper upfront.

The Trade-offs

  • Efficiency: They pull a lot of Amperage. If you run four big Halogen buckets, you’re putting a serious strain on your alternator.

  • Durability: Filaments are fragile. If you’re doing high-speed desert “whoops,” the vibration can literally snap the filament.


The Modern Titan: The Rise of LED Technology

Light Emitting Diodes (LEDs) have revolutionized off-road lighting upgrades. Instead of a fragile filament, they use semiconductors to create light.

Why LEDs Win the Popularity Contest

  • Efficiency: An LED can produce more light while drawing a fraction of the power of a Halogen.

  • Longevity: Most off-road LEDs are rated for 50,000 hours. You will likely sell your truck before the lights burn out.

  • Compact Form Factor: Because LEDs are tiny, manufacturers can create “Light Bars” or small “Pods” that fit into tight spaces like bumpers or grille inserts.

The “White Light” Trap

Most LEDs operate at 5000K to 6000K (Daylight White). While this looks “cool” and modern, it can cause eye fatigue over long night drives because the human eye has to work harder to process high-contrast blue-white light.

Pro Tip: Look for LEDs in the 4000K to 5000K range. It’s the “sweet spot” that mimics natural sunlight, reducing eye strain and helping you spot “trail features” (rocks vs. mud) more accurately.


Beam Patterns: Shaping the Night

Upgrading your lights isn’t just about brightness; it’s about placement. You need different “shapes” of light for different scenarios.

1. Driving Lights (The All-Rounder)

These are designed to supplement your high beams. They have a rectangular or asymmetrical pattern that reaches further than stock lights but still provides some side-to-side coverage.

2. Spot/Pencil Beam (The Long Range)

These are your “tunnel vision” lights. They throw a narrow, concentrated beam extremely far. Essential for high-speed driving where you need to see obstacles before it’s too late to brake.

3. Flood/Scene Lights (The Workhorses)

These throw light in a wide, short pattern. These are perfect for low-speed technical rock crawling or for lighting up a campsite.

4. Fog Lights

Always mounted low. They have a very wide beam with a sharp horizontal “cut-off” to keep light from reflecting off the fog back into your eyes.


Choosing the Best Options: My Recommendations

Top LED Picks

  1. Baja Designs LP-Series: These are the “gold standard.” They use something called Integrated Peripheral Technology (IPT), which provides 200 degrees of light spread.

  2. Rigid Industries E-Series: If you want a light bar that can survive being hit by a sledgehammer, this is it. Their torture tests are legendary in the industry.

  3. KC HiLiTES Gravity LED: These combine the classic “Daylighter” look with modern LED tech. They use a reflector-based system that mimics the look of old-school lights but with insane efficiency.

Top Halogen Picks

  1. HELLA 500FF Series: A classic for a reason. They are thin, easy to mount, and provide a great driving pattern for a fraction of the cost of LEDs.

  2. KC HiLiTES Apollo Pro: These feature a heavy-duty Polymax housing that handles vibration better than most budget lights.


The Hidden Complexity: Wiring and Amp Draw

This is where most beginners fail. You can’t just “tap into” your existing headlight wires for a 50-inch light bar.

Analogy: Imagine trying to breathe through a tiny straw while running a marathon. That’s what happens when you use thin wires for high-powered lights. They will overheat, and you might smell melting plastic—or worse, see flames.

  • Relays are Mandatory: A relay acts as a heavy-duty switch that allows a small signal from your dashboard to trigger a direct connection from the battery to the lights.

  • Fuse Everything: Always place a fuse as close to the battery as possible. If a wire rubs against the chassis and shorts out, the fuse dies so your truck doesn’t.

Expert Warning: Avoid “Chrome” Reflectors in cheap light bars. Cheap units use sprayed-on silver paint that flakes off after one season of heat cycles. High-quality lights use vacuum-metalized reflectors that stay bright for years.


Conclusion: Light Your Path Wisely

Upgrading your off-road lighting is one of the most rewarding DIY projects you can undertake. It changes the look of your vehicle, but more importantly, it changes how you experience the trail.

If you live in a rainy, foggy environment, don’t be afraid to go with a Halogen setup or an LED with an Amber lens. If you’re a desert racer or want the most “bang for your buck” in terms of brightness and durability, LED is the undisputed king.

What’s your current lighting setup? Are you a fan of the classic yellow glow or the modern white-out? Drop a comment below or share your latest night-trail photos with us! Stay safe, and keep the shiny side up.