You are navigating a chaotic downtown core during the morning rush hour. Delivery trucks are blocking the lanes, pedestrian crowds are spilling off the sidewalks, and you have been circling the block for twenty minutes looking for a parking spot. Suddenly, you spot a microscopic space between a massive SUV and a concrete pillar—a space that would be completely impossible for 95% of vehicles on the road. You smoothly cut the wheel, slide into the spot on the first try, and step out onto the pavement without a single scratch on your rims.
During my ten years testing cutting-edge automotive platforms and consulting for urban fleet logistics, I have witnessed a massive engineering paradox. While automotive manufacturers keep building increasingly oversized electric trucks and SUVs, our city streets are not getting any wider. The reality is that packing a massive 100 kWh battery pack into a heavy, three-ton vehicle just to drive three miles to an office building is an absolute waste of energy and physical space. That is exactly why the smallest electric cars are emerging as the true heroes of modern urban transit.
Small-footprint electric vehicles (EVs) strip away unnecessary weight, utilize highly efficient drivetrains, and turn city driving into a fun, nimble game rather than a stressful chore. Let us pull up to the charging station and explore why compact electric platforms are the smartest choices for city dwellers.
The Micro-Urban Blueprint: Why Smaller Batteries Win in the City
To truly appreciate a compact electric vehicle, you have to change how you look at battery metrics.
Think of a massive, long-range electric SUV like a commercial passenger airliner; it is incredible for crossing vast distances, but it is completely useless if you just want to run down to the local corner store. A small electric car is like a high-speed, high-tech bicycle or a motorized scooter. It is designed for quick maneuvers, instant acceleration from stoplights, and plugging into any standard electrical socket without draining a local power grid.
From an engineering perspective, choosing a smaller footprint delivers specific technical advantages for city driving:
-
Incredible Energy Efficiency: Because compact EVs do not have to haul thousands of pounds of structural steel, their energy consumption per mile is remarkably low, allowing them to extract maximum range out of compact, lightweight battery chemistries.
-
Instant Regenerative Braking Returns: Stop-and-go city traffic is usually a nightmare for gasoline cars, but it is an absolute goldmine for small EVs. The continuous braking allows the electric motor to act as a generator, feeding instant electricity back into the battery pack and extending your real-world driving range.
-
Effortless Packaging and Visibility: Without a bulky internal combustion engine or a complex exhaust system to route beneath the cabin, engineers can push the wheels to the absolute corners of the chassis, maximizing interior legroom while keeping the external footprint tiny.
The Best Smallest Electric Cars for Urban Commuters
While the North American market leans heavily toward larger vehicles, the global automotive landscape offers phenomenal small-displacement electric options that balance agility, range, and advanced safety tech.
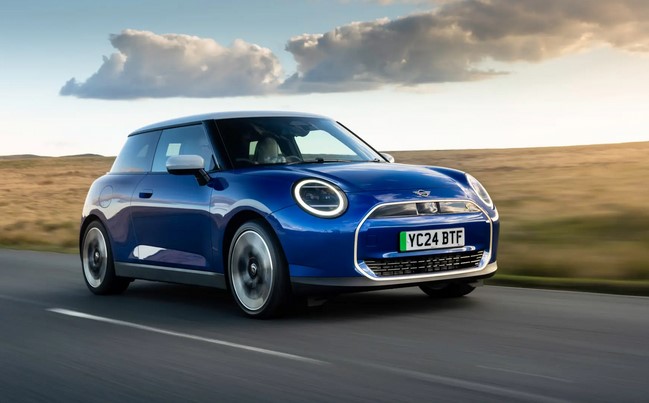
1. The Urban Performance Icon: Cooper Electric
The iconic Cooper has always been the gold standard for compact handling, and its transition to an electric drivetrain has only amplified its legendary “go-kart” driving dynamics.
By mounting a compact lithium-ion battery pack flat along the floorboard, engineers dropped the car’s center of gravity significantly lower than its gasoline-powered siblings. The result is a nimble city car that zips through tight corners with absolute stability, delivering instant electric torque the moment your foot touches the accelerator.
-
Pros: Peerless handling and driving dynamics; premium cabin materials; exceptionally easy to park in microscopic spaces.
-
Cons: The rear passenger legroom is highly restricted; real-world highway range is lower than larger competitors.
2. The Practical Space Miracle: Fiat 500e
Fiat’s modern approach to urban mobility blends retro Italian styling with brilliant interior space packaging, making the 500e a beautiful sight on crowded city streets.
The Fiat 500e features a crisp turning radius that allows you to execute complete U-turns in narrow two-lane alleys. Its electric motor is tuned specifically for low-speed urban slicing, providing snappy, responsive acceleration between 0 and 30 mph without draining the battery pack prematurely.
-
Pros: Beautiful retro design language; incredibly tight turning circle; intuitive digital dashboard interface for beginners.
-
Cons: Limited cargo trunk capacity unless you fold the rear seats entirely flat.
3. The Budget-Friendly Commuter: Chevrolet Bolt EV (Late Models)
For practical buyers entering the secondary or certified pre-owned market, the Chevrolet Bolt EV remains a historic value champion that outclasses many premium brands in raw utility.
While it sits on a small footprint that is easy to park, its tall hatchback roofline provides surprising interior space for four adult passengers. Furthermore, its advanced thermal management system keeps the battery pack at an optimal temperature, ensuring consistent charging speeds even during harsh winter months.
-
Pros: Surprising interior cargo volume; highly competitive real-world driving range; excellent visibility out of the large glass greenhouse.
-
Cons: The factory charging speed maxes out at 55 kW, making long-distance road trip charging slower than modern fast-charging platforms.
EV Vocabulary: Decoding the Tech Specs
Before heading down to a local dealership for a test drive, you should familiarize yourself with these essential electric vehicle terms:
-
kWh (Kilowatt-hour): The unit of measurement for an EV’s battery capacity, much like the size of a gasoline car’s fuel tank (larger numbers mean more energy storage).
-
Regenerative Braking: A mechanical system that reverses the electric motor’s rotation when you lift off the accelerator, slowing the vehicle down while generating electricity to top up the battery.
-
One-Pedal Driving: A driving mode where the regenerative braking is so strong that you can bring the car to a complete stop simply by lifting off the accelerator pedal, rarely needing to touch the physical brake pedal.
-
State of Charge (SoC): The percentage of battery energy remaining in your vehicle, displayed on your digital dashboard screen.
Expert Advice: The Hidden Home Charging Advantage
Pro Tip: Small Batteries Don’t Need Expensive Charging Infrastructure!
This is a crucial financial secret that many traditional car sales representatives completely overlook. When people buy a massive electric SUV with a 100 kWh battery, they are practically forced to spend thousands of dollars hiring an electrician to install a specialized Level 2 240V charging station in their garage just to get a full charge overnight.
However, when you own one of the smallest electric cars equipped with a compact 24 kWh to 40 kWh battery pack, you can easily bypass that expensive upgrade. A standard, common 120V Level 1 wall outlet—the exact same plug you use to charge your smartphone or power a toaster—can easily add 40 to 50 miles of range back into a small EV over a standard 10-hour night. If your daily city commute is under 30 miles, you can live comfortably without ever spending a single dime on specialized home charging equipment.
Embrace the Agile Future of City Transit
Choosing the right platform from the smallest electric cars market segment is a direct vote for urban efficiency, stress-free parking, and low cost of ownership. By stepping away from oversized vehicles and matching your daily mileage needs with a nimble, lightweight electric platform, you can significantly lower your monthly energy bills while turning your daily city commute into an enjoyable, responsive driving experience.
Always check your local municipal incentives and utility company programs before purchasing, as many cities offer substantial tax credits and free public parking structures specifically for zero-emission compact vehicles.
Are you currently considering making the switch to a compact electric car for your daily city driving? Do you prefer a sporty, low-slung hatchback style like the Cooper Electric or a practical, tall-roof commuter like the Bolt? Let me know your urban driving routines or drop your technical EV questions in the comments below!

 When it comes to performance, few things can match the thrill of driving the fastest sports cars in the world. These machines are the pinnacle of automotive engineering, combining unparalleled speed with precision handling and cutting-edge technology. Designed for enthusiasts who crave the ultimate driving experience, the fastest sports cars are more than just vehicles—they’re masterpieces of speed, performance, and style. In this article, we’ll explore the fastest sports cars available in 2025, their remarkable capabilities, and the engineering behind their incredible speed.