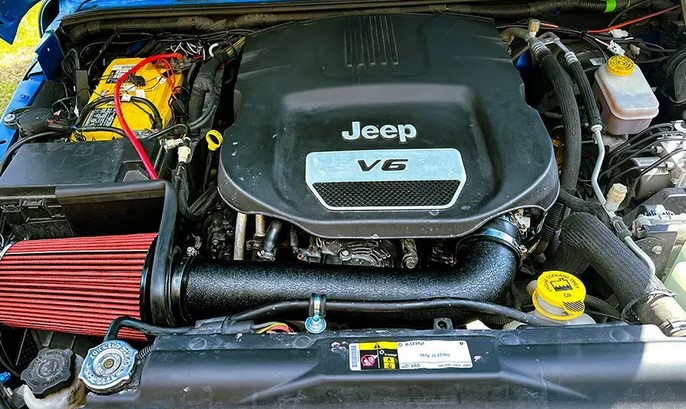
Imagine driving down the highway, pushing your gas pedal down, and feeling… nothing. Just a sluggish, hesitant response from an engine that sounds like it’s choking. In my 10+ years under the hood as a mechanic, I’ve had countless frantic car owners come into my shop thinking their transmission was shot or their fuel injectors were ruined. More than half the time, I open the hood, pull out a pitch-black rectangle caked in dust, bugs, and debris, and show it to them.
Your engine is essentially a giant air pump. To generate power, it needs a constant mix of fuel and oxygen. Think of your car’s air filter as the lungs of your vehicle. If you’ve ever tried to go for a sprint while breathing through a thick wool scarf, you know exactly how your engine feels when that filter is clogged.
Learning how to clean a car’s air filter is one of the easiest, most satisfying DIY maintenance tasks you can perform. It saves you a pricey trip to the mechanic, restores your fuel economy, and brings that crisp throttle response right back to life. Let’s dive into exactly how to do it without breaking anything.
First Things First: Can Your Filter Actually Be Cleaned?
Before you grab your tools, we need to address a crucial technical detail. Not all air filters are created equal, and trying to clean the wrong type will ruin it completely.
Disposable Paper Filters vs. Washable Performance Filters
-
OEM Paper Filters: Most factory cars come equipped with standard pleated paper filters. These cannot be washed. Water or cleaning fluid will destroy the paper fibers, rendering them useless. If you have a paper filter, you can gently tap out loose debris, but if it’s deeply discolored, it must be replaced.
-
Reusable/Performance Filters: Brands like K&N, AEM, or dry-flow aftermarket filters are made of cotton gauze, synthetic materials, or foam. These are specifically engineered to be cleaned, re-oiled (in some cases), and reused for hundreds of thousands of miles.
Pro Tip from the Garage: Hold your filter up to a bright overhead light or the sun. If light easily passes through the pleats after a gentle tap, it’s still good. If it looks like a solid block of charcoal and blocks all light, it’s time for a deep clean or a total replacement.
Tools and Materials You’ll Need
You don’t need an advanced toolbox for this. In fact, you probably have most of this sitting in your garage or laundry room right now.
-
A specialized air filter cleaning solution (or a mild liquid dish soap)
-
A soft-bristle brush (an old toothbrush works beautifully)
-
A bucket of warm water
-
Clean, lint-free microfiber towels
-
Filter oil (Only if your aftermarket filter explicitly requires it)
-
Basic hand tools (usually just a flathead screwdriver or a socket wrench to open the air box)
Step-by-Step Guide: How to Clean a Car’s Air Filter
Follow these steps precisely to ensure you don’t accidentally introduce dirt into your engine’s intake tract.
Step 1: Locate the Air Filter Box (Air Housing)
Pop your hood and look for a large, black plastic box sitting near the top or side of the engine. It is usually connected to a thick, ribbed plastic hose that leads directly into the engine intake.
Step 2: Open the Housing and Remove the Filter
Most modern cars use simple metal clips that you can snap open with your fingers. Older or heavy-duty vehicles might secure the housing with a few screws or bolts. Carefully undo them, lift the cover, and slide the filter out.
Crucial Warning: The moment the filter is out, your engine’s intake is exposed. Take a clean microfiber towel and temporarily cover the open intake pipe. The absolute last thing you want is a stray bolt, leaf, or bug dropping down into your engine cylinders while you are busy cleaning.
Step 3: Loose Debris Removal (The Dry Clean)
Before getting the filter wet, hold it upside down and gently tap it against a hard surface like your garbage can. Watch the dust fly! Take your soft brush and gently sweep between the pleats to remove trapped leaves, dead bugs, and loose dirt chunks. Always brush away from the clean side of the filter.
Step 4: Apply the Cleaner and Soak
Spray your air filter cleaner generously onto both sides of the filter. If you don’t have a specialized spray, mix a tablespoon of mild dish soap into a bucket of warm water and submerge the filter.
Let the cleaning solution sit and break down the accumulated grease and grime for about 10 to 15 minutes. Do not scrub aggressively, as you can tear the cotton or synthetic fabric.
Step 5: Rinse it Out Properly
Rinse the filter using low-pressure water from a garden hose or a sink faucet.
The Golden Rule of Rinsing: Always run the water from the clean side of the filter out through the dirty side. This flushes the dirt backwards out of the fabric instead of driving it deeper into the filtration layers. Avoid high-pressure nozzles, as they will punch holes right through the filter media.
Step 6: The Long Shake and Air Dry
Shake off the excess water. Now comes the part that requires patience: let it air dry completely.
Do not use a heat gun, hair dryer, or compressed air to speed up this process. Intense heat can shrink the filter fibers, and compressed air will blast microscopic holes through the fabric, allowing engine-damaging dust to pass through later. Place it in a clean, sunny spot and wait. This usually takes a few hours.
Step 7: Re-Oiling (If Applicable)
If you are using an oiled cotton filter (like a classic red K&N filter), you must apply a fresh layer of filter oil once it is 100% dry. Spray a light, even coat along the top of each pleat.
Do not over-oil your filter! I cannot stress this enough. If you drench the filter in oil, the excess oil will get sucked into your intake system and coat your Mass Airflow (MAF) Sensor. A contaminated MAF sensor will throw a Check Engine Light, cause rough idling, and ruin your fuel economy. Keep the coating light and uniform. If you have a “dry” synthetic performance filter, skip this step entirely.
Step 8: Reinstall and Button Up
Remove the temporary towel you placed over the engine intake. Drop your clean, dry filter back into the housing. Ensure it sits perfectly flush within the rubber seals of the air box—if it’s misaligned, unfiltered air will bypass it entirely. Snap the clips back into place or tighten down the bolts, and you are officially done!
How Often Should You Clean Your Air Filter?
As a rule of thumb, you should check your air filter every 10,000 to 15,000 miles. However, your environment dictates your maintenance schedule.
| Driving Environment | Recommended Inspection Frequency |
| City/Highway (Normal) | Inspect every 12 months / 12,000 miles |
| Dusty/Rural/Construction Zones | Inspect every 3 to 6 months |
| Arid/Desert Regions | Inspect every 3,000 miles (with every oil change) |
If you frequently drive on dirt roads or live in a highly polluted metropolitan area, your filter will choke up twice as fast. Regular checks keep your horsepower up and your fuel costs down.
The Verdict: A Simple Job with Massive Benefits
Cleaning your reusable car air filter is a straightforward weekend project that yields immediate results. You’ll feel the difference the moment you step on the gas pedal: smoother acceleration, a happier engine note, and a few extra miles out of your fuel tank. Plus, keeping that dirt out extends the overall lifespan of your engine internals significantly.
How does your car’s air filter look right now? Have you ever encountered a completely blocked intake while working on your vehicle? Drop your stories, questions, or any DIY struggles you’ve had in the comments section below—I’ll be hanging out to answer them and talk shop!