You are sitting in your car on a scorching July afternoon, the asphalt outside radiating waves of visible heat. You slide the temperature dial all the way to maximum cold, crank the fan speed to full blast, and wait for that blissful wave of arctic air. Instead, the dashboard vents breathe out a lazy, lukewarm puff of air that feels exactly like a hairdryer. Within minutes, your cabin transforms into a rolling greenhouse, and your commute turns into a test of absolute endurance.
During my ten years diagnosing mechanical issues under hoods, I have seen automotive air conditioning systems bring the toughest car owners to their knees. A vehicle’s climate control system is not a luxury option; it is a critical safety component that keeps you alert behind the wheel. The heartbreaking reality is that many drivers spend hundreds of dollars at predatory repair shops for simple issues that could have been identified at home with a bit of systematic troubleshooting.
Understanding common car AC problems and fixes can help you save your wallet from unnecessary drain and pinpoint exactly why your vehicle has lost its cool. Let us lift the hood and decode the thermodynamic mysteries of your car’s climate control system.
The Refrigerator on Wheels: How Your Car’s AC Works
To troubleshoot an automotive cooling issue, you must first understand that your car’s AC does not actually create cold air out of nothing. Instead, it is a heat-extraction machine.
Think of your car’s AC system like a continuous team of microscopic sponges. The system uses a specialized gas called refrigerant to absorb the heat inside your dashboard, carry it out to the engine bay, squeeze that heat out into the atmosphere, and then loop back inside to absorb more warmth.
From a technical perspective, this closed-loop chemical cycle relies on five core mechanical components working in absolute harmony:
-
The AC Compressor: The absolute heart of the system. Powered by your engine’s serpentine belt, it pressurizes the refrigerant gas and forces it to travel through the system lines.
-
The Condenser: Mounted right in front of your car’s radiator. It acts like a mesh cooling grid, taking hot, pressurized gas from the compressor and cooling it down into a high-pressure liquid.
-
The Receiver-Drier / Accumulator: A protective filtration canister filled with desiccant beads that scrubs moisture and tiny debris out of the moving refrigerant.
-
The Expansion Valve / Orifice Tube: A microscopic gatekeeper that drops the pressure of the liquid refrigerant, causing it to flash-freeze into an incredibly cold liquid spray.
-
The Evaporator: Tucked deep inside your dashboard. Your interior cabin fan blows air across this ice-cold aluminum matrix, stripping heat out of the air and delivering pure, frosty comfort into the cabin.
Diagnosing the Symptoms: Common Car AC Problems and Fixes
When an automotive AC loop breaks down, it leaves distinct mechanical and acoustic clues. Here is how to diagnose the most common cooling failures like a professional technician.
1. The Air is Lukewarm or Warm
This is the single most frequent complaint in the service bays. If the fan blows strongly but the air temperature matches the outside environment, your system is failing to extract heat.
-
The Cause: The vast majority of the time, this points to a low refrigerant charge caused by a microscopic leak somewhere in the rubber hoses, O-rings, or aluminum line fittings. Modern vehicles use precise amounts of R134a or R1234yf refrigerant measured down to the ounce; if your system loses just a few ounces of gas, internal pressure switches will shut down the system to prevent internal components from running dry.
-
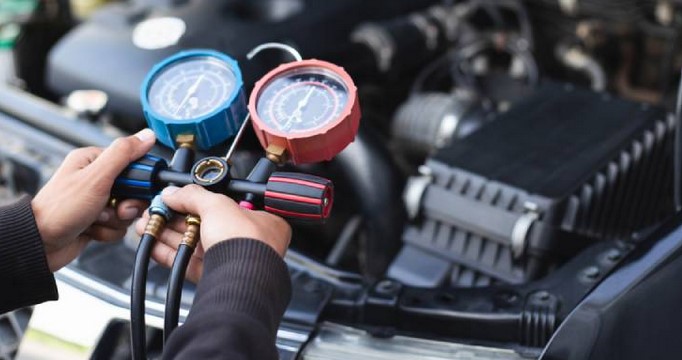
The Fix: Connect an AC pressure gauge set to the low-side and high-side service ports. If pressures read near zero, you must perform a professional system leak test using UV dye, patch the offending seal, pull a deep vacuum on the loop using a vacuum pump to eliminate moisture, and recharge the system to factory weight specifications.
2. The Fan Blows Cold at First, Then Slowly Turns Warm
You start your car, and for the first ten minutes, the air conditioning works perfectly. But as you hit the highway, the air slowly loses its icy bite and turns into a muggy breeze.
-
The Cause: This classic symptom indicates that your system is literally freezing over. If moisture accidentally seeps into the closed loop, it will freeze inside the tiny orifice of the expansion valve, blocking the flow of refrigerant entirely. Alternatively, a clogged cabin air filter or a failing evaporator temperature sensor can cause the external aluminum fins of the evaporator core to turn into a solid block of ice, blocking all airflow.
-
The Check: Pop your hood when the cooling stops and look at the thick, insulated aluminum line running out of your firewall. If it is coated in thick white frost, your system is freezing.
-
The Fix: Turn off the AC button but leave the fan running on high for 15 minutes to melt the ice. To permanently fix the issue, replace a restricted cabin air filter to restore optimal airflow, or have a technician evacuate the loop and replace the receiver-drier to scrub out internal moisture contamination.
3. Excellent Cold Air on the Highway, But Lukewarm When Idling at a Red Light
Your car feels like an igloo while cruising down the highway, but the moment you pull off the exit ramp and sit at a traffic light, the cabin instantly becomes warm and stuffy.
-
The Cause: This issue points directly to a lack of airflow across the front condenser assembly. When your car is flying down the highway, ram-air naturally pushes through the front grille to cool the refrigerant. When you stop moving, you are entirely dependent on the electric engine cooling fans to pull air through the condenser matrix.
-
The Fix: Start your car, turn the AC to max, safely open the hood, and look behind the grille. If the electric radiator fans are dead silent, you are likely dealing with a blown cooling fan relay, a corroded wiring harness, or a burned-out fan motor that needs immediate replacement.
Essential AC Jargon: Navigating the Technical Terms
When you talk to an automotive specialist or look for parts online, you will run across specific technical terms:
-
Refrigerant (R134a / R1234yf): The specialized chemical fluid engineered to undergo rapid phase changes from gas to liquid to move heat.
-
Compressor Clutch: An electromagnetic disc attached to the front of the compressor that snaps forward to lock onto the spinning engine pulley when you press the AC dashboard button.
-
Low-Side and High-Side Ports: The two specialized quick-connect metal service valves used to hook up diagnostic pressure gauges to the system lines.
-
PAG Oil: A specialized synthetic lubricant mixed directly with the refrigerant gas to keep the internal pistons of the compressor continuously lubricated.
Expert Advice: The DIY Recharge Can Catastrophe
Pro Tip: Step Away from the “Death Can” Recharge Kits!
This is a critical warning that every master mechanic wishes consumers understood. When your car’s air conditioning stops blowing cold, it is incredibly tempting to run to a local auto parts store, buy a cheap retail aerosol can of refrigerant with a plastic gauge, and dump it into your low-side port. In the automotive industry, we call these “death cans.”
These consumer cans often contain generic leak-sealing additives designed to gum up rubber gaskets. However, that sticky sealer also hardens inside your expansion valve and coats the internal walls of your compressor, completely ruining the entire system from the inside out. Furthermore, because these basic plastic gauges only measure low-side pressure, it is incredibly easy to overcharge your system. Too much refrigerant increases system pressures to dangerous levels, which can cause your compressor to lock up permanently and destroy a $1,000 component instantly. Always measure your system using proper dual gauges or take it to a shop with an automated recovery machine.
Maintain Your Cool Behind the Wheel
Tackling common car AC problems and fixes does not have to be an intimidating ordeal. By paying close attention to whether your issue is caused by weak airflow, bad sensor inputs, or incorrect system pressures, you can approach repairs with confidence and protect your vehicle from cascading component failures.
Before diving into complex mechanical work, always perform the easiest check on the planet: slide out your cabin air filter from behind your glove box. If it is packed solid with leaves, dust, and debris, replacing that simple $15 filter might be the only fix standing between you and arctic comfort.
Is your car currently struggling to keep you cool during your summer drives? Have you checked your electric cooling fans or cabin filter yet? Let me know your specific symptoms or drop your diagnostic questions in the comments below!


 Imagine this: You’ve just hopped into your car for a four-hour road trip. You spend the first fifteen minutes wrestling with a glitchy Bluetooth connection, your navigation map looks like a pixelated relic from 2005, and every time you try to change the radio station, the screen freezes for three seconds. By the time you actually leave your driveway, you’re already frustrated, and the “joy of the drive” has vanished before the engine is even warm.